Pages

Thursday, September 24, 2020

Art 2: Emulation Matrix - Photo shoot

Similar to the other project that included the photo montage. What is to be done is this task is to analyse what we have made. In this case, it is a photo that we have shot with some figures. This type of artwork is a method that DavidLevinthal has used, by which we take him as our inspiration and look at using the method that he has used in his works. After the image has been taken I have analysed the photo as such. 


What is seen in the photograph are seven figures that filled most of the image almost completely. As well as a light that shines through under the figures. This shot was a result of around 4 previous shots that reveal the unwanted subject matter. However, in this particular piece, it does not include any subject matter that is not wanted. The photograph is in black and white; but, the image does have a tone of blue. The figures are the ones that take up the most space in the image.  The direction of the light is behind the figures, towards the viewer.


The method in doing so is to make the subject almost pop out and seem imposing in a way. The camera shot that was used in this image was of a full shot, the image includes the full body if the figures, it also includes a dutch tilt. Also, this shot includes a low angle to again almost make the subject look overpowering.


How the figures were set horizontally one can view it that could lead from one side to the other. With also how the figures are standing, from the light could lead onto the tip of the barrel. Focal points--first that is noticed are the figures, the middles especially because of the light that passes through the legs.


Symmetry is used quite noticeably in this image as with how the figures are put in a pattern of light and dark throughout the image. The image is quite flat, aside from the factor that is the light that makes figures more 3 dimensional. Though with the dark background it can be seen as a deep space within the image. It felt somehow dominating. It gives off like a “cool” vibe, it looks realistic in a way as “mistakes” have been put intentionally. Because the figures are not lines up too perfectly, it gives realism. Though somehow, with all of the dominating aspects it also gives a comedic effect.


Tuesday, September 22, 2020

Huruamnu 2: Hands

In this hurumanu, in the science section, we begin looking at the bones, tissues and muscles that make up the hand. For this, we have then learned about what the parts that make the hand; tendons, bones, cartilage, joints, ligaments, muscles and skin. What we have understood is the function of each. Tendons, they are what connects the bones onto the muscles, contracting and relaxing, moving. Bones are the whitish tissues that make up the skeleton of a human. Cartilage, within in each joint (a junction in which bones meet) there is cartilage, it is a connective tissue that keeps the bones from rubbing together. Ligaments, similar to the tendons, however this instead of connecting bone to muscles, connect bone to bone. Finally, the skin is the largest organ of the body, protecting it from microbes, elements,  permitting the sensation of toucha s well as regulate our temperature.

As we have completed the study, we then look at making a "hand". Made by cutting paper in a shape of a hand, tubes are then cut out to represent the bones of the hand. Each of the fingers aside from the thumb contains 3 bones whilst the thumb contains 2 bones. After the tubes have been placed accordingly at the cutout hand, cut stings and attach it to the end tube which is to be at the fingertips. Thereafter, insert the strings inside of the tube leading into a point which leads to the wrist. 


Sunday, September 20, 2020

HEC: Mini Applesauce Mufffins

Mini Applesauce Muffins

Ingredients

1 c Apple sauce
2 T Butter, melted & slightly cooled, or canola, a neutral oil
1 Egg, lightly beaten
1/2 c milk or soy milk
1 t vanilla essence
1 c wholemeal flour or white flour
1/2 c rolled oats
1/4 c sugar
1 t baking powder
1/2 t baking soda
1 t cinnamon 

For this recipe, the ingredients are collected (Mise en Place), then the method is started. The recipe is quite straightforward that it mixes the ingredients first based on their state. The liquids are mixed together and the dry ingredients are mixed together as well. But previous to that the oven is to be preheated at the temperature of 180oC degrees.
 With mixing the liquid ingredients it will be wise to beat the egg first then mix with the other liquid ingredients. A whisk is not really needed just fork would be good enough for this activity. After they have mixed together then fold it with the dry ingredients. 

Mix the dry ingredients first before the adding of the liquid ingredients as this will make sure it is equally blended. The liquid and dry ingredients are to be folded, just until the dry ingredients are mixed in with the wet mixture. The mixture is then put in lined up small muffin trays, with the excess being put in a different tray that was not lined up. Put the trays in the oven for approx 10 mins though more likely it should be in for about 15 to 16 mins or so. 

After the batter has cooked and turned into muffins it is then to be put into a cooling tray. For this practical lessonwe were to taste test the different muffins from each groups, with each having a slightly altered version of the original one. For this recipe that we have done, we were given the butter and soy milk. With the other groups containing the following:

Group 1 : Original muffins - It was okay. It was creamy, nice blend, could use sweeter flavor and cinnamon.

Group 2 : Butter & Wholemeal flour - It was okay. It was quite soft in texture and could be more structured.

Group 3 : Canola & Wholemeal flour - It was okay. It was rough on the outside but the texture was soft in the inside. The blends were nice.

My Group : Butter & Soy -  My group thought the muffins were okay. They thought the muffins could of been better if it was more creamier, more flavor, sweetness and not too strong.

With all of the taste tasting and rating of the different muffins, there wasn't any that was better than 'ok'. All were too much lacking in some way. Overall all of the following were lacking on flavour, the amount of cinnamon was not enough. For me personally I would have liked if the muffins were just a touch sweeter as I figured that they were quite bland. Given that we only had to taste a singular muffin (for each group) that was quite small, it should be more flavourful and much more intense. In addtition, the amount of time that the muffins have been cooled may have been another factor in them just being 'ok'. As the time was not much for us to cool, the muffins were still just out of the oven for only a few moments. That may have been the reason for their structure, there were all quite soft [too soft] espicially group 2.  
(Special mention- The muffins that were in the unlined tray were much better in structure, they had a crust on the outside, contrasting the softness inside)

Wednesday, September 16, 2020

Hurumanu 1: Sustainability

Within our Hurumanu 1, we have bee learning about sustainability. Looking at different ways into which sustainability can be claimed. We have also looked at sustainability that is in regards into the 'Global warming'. Thereafter we then look at the several aspects of being sustainable. And so, we have been tasked with defining the aspects that have been mentioned, as well as being able to understand what we have discussed about. These are the aspects that have been defined, learned and understood. 

SUSTAINABILITY: 

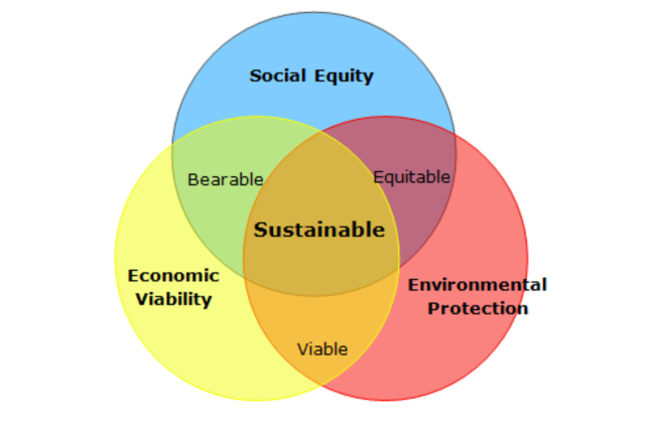
The three aspects of sustainability: Definitions
Environmental Sustainability: Environmental sustainability--mainly the act to maintain the living beings such as animals, plants and natural resources of our planet. 
Social Sustainability: Creating as well as maintaining the equality across groups and generations. Systems of citizen agreement, discussions of the positive and negative impacts in our communities and building from those and creating a better society.
Economic Sustainability: By this is it meant that the taking as well as the usage of our resources at a safe rate. Doing so would guarantee the same resources would be still used after the and in the future generations.
________________________________________________
Sustainable Development: Economic development is a conducted progress that is without the excessive diminution of natural resources. 
Definition and meaning:
Bearable: Resources are shared and provided equally between social groups.
Viable: The environment must be used in a way that provides for ongoing economic needs.
 Society's use of the environment must not be destructive. 
 
The three pillars of sustainability 

The three pillars of sustainability


Within our topics, we began to understand the terms that are used in such subjects. Further discussing the previous 3 aspects of sustainability. We look at examples where it connects to each other. What do these aspects affects? Through this, we then began to look at understanding keywords that would relate to such. As we look at these words we look at again, defining and finding the meaning of each of the words. Then we arrange the said words into their definition and then colour code them.
With the colour coding, we have been presented with 3 colours that we can use into subjecting these terms into their respective places. The colours represent what we think is happing through such. With being that we think it is getting worse, orange no better nor worse and green as getting better. Most I have created as being red, though there is a choice that I am not quite as sure, with the first choice. I think that indeed many species are getting endangered, but every day there are several species are being extinct, though most are bacteria. However, with the rate of extinction, I do not think that it is changing though with teh endangered (major) animals that can soon change. 

Marine Resources
What are the main aspects of your topic?
Over Exploitation
Pollution of the sea
Ocean dumping
Ocean Acidation
Oil spills
Global warming
Marine life
Marine ecosystems

What are the causes?What are the effects?

Causes in which Marine resources are on danger are as such; overexploitation, the overtaking of resources for consumption such as marine life. The amount of resources that are taken from the sea can and will affect the circle of life and the balance of nature. This could mean that by making and taking of a vastly large amount of a certain type of species would mean its extinction; not only that but another type of species that is reliant on it as well.  

Pollution to the sea, that incudes ocean dumping, the tons of garbage that are put in our ocean create a hazard for the marine life that resides within the area. It has been reported that in a lot of such areas, ocean life that has been caught in such, inside of the stomach contains plastic that has been eaten as a result of this pollution. 
Similarly, the with pollution of garbage comes oil as well. The spilling and pollution of oil to the water and the surrounding corals and sea life poses grave danger to the future of the area. Not only that but for the generation of marine life that will live in that area. 

Global warming is another cause for danger surrounding the land but as well as marine life around the world. Even the slightest change in temperature affects how the ecosystem functions, not only that but as well the habitat in which species reside will be altered as well. Speaking of, ocean acidification is connected to this topic as well. The carbon dioxide that is placed in our atmosphere can be absorbed by the waters, this can cause the ocean to have an abnormal amount of acidity. This can cause the water to be like a poison to marine life, the constant acidification would make it impossible for most marine life to survive the oceans.

Graph:
 
Concluding this idea, after the research has been completed we have been able to create this graph along with my partner. We have looked at several questions and inquiries about the topic surrounding the marine life. We have to look at them individually and looking at the data that is compiled about the questions. However, for most of the inquiries that we have looked at we have not found proper data that can be converted into a pleasing graph. We moved and discussed other wondering that we could be able to do. Varying from, what does, global warming, pollution and over-exploitation does to the marine life? What are the most affected marine animals? However, from all of the questions that we have drafted, we chose the one which states, asks, 'What country over-fished the most?
For which we have gotten and analyzed the data for. So far in our data, we have understood that the country that has overexploited the most is China. As with such we can understand and inferred that much of the species of fishes in the country are in danger. Which is followed by Peru which is about 3 million tons lower. 


For the final project of this semester, we are to create an object that is meant to relate mainly to sustainability. after the writing of the essay, we look at some of the other parts of the being sustainable. For this, we look at aspects such as environmental relating to species of animals, them being endangered, how we are able to prevent to do so. A game is created for this purpose, meant to inform whilst playing and enjoyment. our group have chosen to manufacture a game for the reasons of it being physically interactable. It also connects to social sustainability, helping to bind and unite people together. We thoughts of many ideas ranging from a card game to a board game, hence we combined and took inspiration from games that have been played before by us. Thinking of a title of the game, again there were ideas but we have thought that they have not been creative enough and by snap decision we took a play of words with the use of our own language we come up with "Climaticus the Big Bangus". We created cards using printing, creating the board with a strong type of cardboard that is appropriate for such tasks. With the playable characters, however, we were to 3D print but some malfunctions have occurred and so we will just use resources that we can to do so. 
The cards needed for the game does have some areas for modification, like the logo at the back but it has been an enjoyable experience. 


Friday, September 11, 2020

Composition: Thumbnail Sketch

For another task in Art, we look at composition of pictures in which we are to analyse the elements in the image. First we discuss the many types of subjects, different categories that a photo could have. We look at the focal point, what is the focus of the photo? Along with the discussion and the explanation we are shown a picture that relates into the text that is given. Thereafter we further look at different other texts that (some) will be later used in the making and completion of the task. After some time, we are then to launch into our task. The task that is given is to pick, choose a photo that is liked by you and make a sketch of it. Through it you would need to again, analyse it. We are given four of the topics that were explained to us previously. Which are, ‘Focal Point, ‘Leading Lines’, ‘Symmetry/Asymmetry’ and ‘Rule of Thirds’.  

 I have analysed it as such. The picture has its focal point at the end of the river, another element worth to mention is the moon that is shown in the picture. They are the focus of the picture, the most prominent in the photo. The leading lines that are seen is the edge of the river that leads to the end which then ends onto the moon. It has a sort of symmetry around the middle, there can be seen a separation which leads onto the left side being darker while the right are being lighter. Finally the Rule of Thirds, the picture has been separated into 9 even square-like shapes. It is said with it, in photos the focus of it should be in the intersection that are seen in the middle. Though, the photo that I have aquired do not possess the rule of thirds as seen by the implementation of the lines in the sketch.

HEC: Apple Crumble

Apple Crumble


Ingredients

1/2 c Flour
1/2 c Brown Sugar
1/2 - 3/4 t Cinnamon
75g of butter
3/4 c of rolled oats
2-3 medium-sized apples (Granny apples are great)
1 T white sugar
1 T water


The Mise en Place, it will consist of the following ingredients as well as how they are prepped.  First, the ingredients are collected. Flour and the brown sugar are placed into a medium-sized bowl in which the cinnamon is added also. The butter is then cubbed fairly small in which then it is put on the flour mixture. The cubbed butter and flour mixture is rubbed together up to which it is fluffy and quite light. Until there are no lumps of butter in the mixture, then, the rolled oats are then mixed in using a fork. To mix the oats in, just toss the mixture around to make sure that it will still be quite fluffy. 
While that has been happening, 2- 3 medium-sized apples are peeled. First, peel the apples and core them. One of the easiest ways to do that is to, after the apples have been peeled, cut them into quarters lengthwise.
Next, lay the apples on either side, which is flat then approximate where the core ends and cut diagonally.
Do so with the rest of the apples and cut them thinly, preferably around 3mm no more than 5mm. 

Set the dish where the crumble should be cooked; a ramekin or a pie dish, coat the inside with a non-stick spray or butter. Place the apple inside, arrange them accordingly. For extra sweetness, you may want to add just a sprinkle of white sugar on top, but no more than a pinch. Before the mixture is placed on top, if using fresh apples, add just a half a teaspoon, to a teaspoon of water for each ramekin; around a tablespoon of water if using a pie dish. This will just help to cook the apples and not leave them too dry.
Finally, place the pie dish or ramekin into a preheated oven 180oC on fan-bake, leave for around 15-mins, until the top has golden brown and has become hard.

After cooking, this dish has been served with a vanilla ice cream on top. This helps to cool down the dish and give an extra texture.  The dish itself was ok for me, the apples were quite nice and blended well with the 'crumble'.  Though, for me, it had an over-powering amount of the mixture on top. lessening the amount of mixture would be the next step. as it has become too sweet--for my taste. There isn't much to say around the other aspect of the dish. The rough texture, with the oats, had mixed with the soft apples giving it a well-rounded feeling, per se. The scent of the cinnamon contributed well with the dish as well.


Wednesday, September 9, 2020

Huruamnu 2: Film Study - Task 2

 This rotation in our Hurumanu 2 we have bot been looking at science and film study. In this blog, we focus on film study and the tasks that are involved with this topic. With the said tasks, we come into our second tasks in which focuses on camera shots, angles as well as movement. For this we are given a variety of different shots, angles and movements; we are then to arrange them in a way that connects into their right places.  Thereafter we transfer into making our presentation into which we can present what we have created online.


What am I learning? 

With this topic, I, personally have learnt a great deal about cinematography. For such I have then encountered a vast range of shots that I haven't even noticed when watching a film. As such I have also learned how each of this shot could be used to convey an emotion. Within the likes of a low angle shot, it conveys a feeling of greatness, a threat, while a high angle conveys, weakness and fragile. Looking s well in the older films I began to realise how the shot of say, "The Shinning"(Stanley Kubrik), most of the frames are like a work of art, with the placement of the camera and view. The same can be said for the ingenuity of Alfred Hitchcock with his usage of shots and angles.

How does this work show my learning?

The presentation shows my working in by putting in what I have learnt within each of the shots, angles and movement. By my understanding of each of the shots, angles and movement; I have looked within several of the films that I have watched and have analyzed and put in shot in accordance with the category.

What am I wondering as a result of this learning?

Within my current knowledge that I have acquired, there are several wonders that I ask. How many kinds of shots are used in a film? How many shots and changes are too much? How could the arrangement of certain shot have a totally different effect from a singular?

Hurumanu 2 Film Study - Task 1

During the Film Study part of our hurumanu, we are to look at 'Visual and Sound Techniques' that used in cinematography. These are very much fundamental in creating a good film. Knowing which, identifying and choosing the right techniques could be the deciding factor in the rate and the quality of the film. In this task, we are to look at the many different 'Visual and Sound Techniques', identify so and explain each of them. For this task, I have created a 'dictionary' in which store the data that I have collected into researching into this task. The data that is collected contains the meaning of each term that has been given to us for research and study. 


What am I learning? 
Learning about the many different ways in which visual and sounds are used in a film. Varying from the change of mood, feeling and the characters that are present in each scene. It is fundamental that these are used in making a successful film, knowing how there put, and understanding why is also a factor in such.

How does this work show my learning?
By collecting the data and putting what I have understood into the research that I have done; I have compiled such in a manner that is for everyone to see.

What am I wondering as a result of this learning?
With such, I wonder about the different ways in which these can be used. How these came to be? Was there a traditional, cultural or at all any story into which these are in this era? 


Friday, September 4, 2020

Art: Montage

In my options, subject options, I have chosen art as one of my subjects. For this term, we have begun to focus on works of arts that are related to photomontages. Specifically those of the works of Hannah Hoch's. A photo montage is similar to a photo collage and to a modern technique popularly called photoshop.  It is the arrangement of photos in a way that conveys an idea by putting them in certain ways. At times the outcome of the finished montage does not at all look like the photos in which we have started with. As we have learned, we have also been tasked with making our own photomontages. For this first, we needed to make pages around 8-9 in where we can put pictures that we would like to put in our actual collage. We needed to use photos that were labelled for reuse and have edited and contorted them in ways that we desired to make 3 collages. 

The subject is not just 1 object, it is a multiple of mixtures. I want the eye of the viewer to search around with their eyes. Mostly though the topic of this collage is Japanese tradition. They are all intertwined through each still provides a piece, much like a jigsaw puzzle. Looking at the mythology of Japan, I use photos that will contribute to the picture. All of the fragments are of Japanese source, however, each does not bore the eye with such collage. It is a tribute to a Japanese art form, Kabuki, it is a stage play much like a “theatre”. The imaginative and beautiful clothing, style that they put in. 


The scale of the pictures that are used in the collage is varied. There are some parts that I have emphasized through, enlargement and teh change in contrast and colour. The collage possesses a mixture of colour, varying from black and white, colour as well as sepia. Even as if there is a mixture of colour that has been used, it still somehow produces a vintage feeling montage. Sepia and colour, quite blend together; there are elements which blurs the edges. Having a warm coloured background, with a sepia subject creates an “earthy” texture. Types of art that I have included, are as such, drawings, portraits, paintings, landscapes and real pictures. Some of the landscape and the drawings have been created as a background to further confuse the eyes.

The fragments are layered, though it could still somewhat be perceived as a flat imagery. I do not have repeating parts. All of the added fragments are all different. There is not a “most” important part, though they vary in size they all contribute quite equal to the picture. For this particular piece, I have used a function that added shadows, yet it isn’t too visible. I have used layering and overlapping, with like a theatre performance set.

I want the viewers to wander their eyes around the picture. Puzzled at the fragments and the many colours of this montage. There is no meaning as such in the montage, but having combined the pieces in such a way, creates a mood of abundance where the viewer can’t focus on a singular point. There is such values in the montage but one of what I think I would interpret it; within my art learn to focus on one part. Within the many “distractions”--the many fragments--you should focus on what you want. I have thought of a meaning which is contradicting what I have said in the previous, which is focusing on a singular subject. For this, I have also found that it could also be interpreted as there are many things that are around, try all the different pieces and see all the many different views and outlook that can be seen.

For my art, personally, I do not want a set meaning, for me, there is to be not a singular meaning into my art. Though I have taken inspiration and likeness into Japanese art and theatre; also have conveyed a certain feeling through the colour. I want the viewer to make their own meanings, what can you see from the art that I have created? I want those who view my art to-- as if I want them to make their own collage within my collage.  Connecting, piecing and putting together fragments of the montage and making a new story each time it is viewed. Looking at it in each time with a new perspective.


Thursday, September 3, 2020

HEC: Potato Frittata

Potato Frittata

Ingredients

1-2 potatoes
3-4 eggs
small onion (optional) red
Capsicum 1/4
Broccoli
Spinach
Peas and corn
Oil
Cheese

First, 'Mise en place' and then the preparation of the ingredients. For this, we would need to dice the potatoes roughly around 1cm. To begin wash and peel the potatoes--(for this recipe the potatoes do not need to be perfectly the same as each other. But if you want to do so, first, cut strips of the potatoes around the sides, so that it then turns into a rectangle shape. Cut it length-wise into around 1cm, and the same goes for the width.) But it is also fine to skip the first step which is turning the potato in a rectangular shape. Boil the potatoes until soft, while that happens, dice the onions and finely dice the capsicum.  Roughly cut the spinach, spinach naturally shrinks while it is cooked, a small cut of spinach will turn quite small in the cooking process.  As the boiling of teh potatoes come to an end, blanch the broccoli (quickly putting the vegetable in boiling water for a short period of time until it softens).

Fry the potatoes in a medium heated pan until golden or slightly darker than golden.  Make sure that with the oil, the potatoes should be of the same or mostly the same colour in each side. By that, turn the potatoes every so often to achieve. While the potatoes are being fried, whisk the eggs, put salt in until desired. The salt not only flavours the eggs but also helps to break down the proteins in the eggs making it better to whisk and blend. After the potatoes are fried, put them into the eggs as well as the rest of the ingredients. Aside from the onions (optional, capsicum and spinach), sautee it and then put it in the rest, put in also a bit of cheese. Oil the pan and pour the mixture in, medium-low heat, take a look at the bottom of the mixture and see if it has browned in the bottom, take it off the heat. Pour more cheese atop and cook in a preheated oven of around 200oC. 
Bake until teh cheese has melted and browned, then take it off and serve. For taste, it wasn't a light dish per se but still, it was good. The cheese went nice with all the ingredients but teh vegetables did not produce much of a taste. Next step could mean putting stronger flavoured vegetables in, personally, I would put garlic in, green onions would be a nice touch as well. We have not flavoured the dish to what we feel was enough, I would say increase the amount of seasoning, more salt. Lastly, I would enjoy this with a condiment or like a relish. 


Tuesday, September 1, 2020

Art: Montage

For the past few lessons of art, we have focused on "Montages", specifically some of Hannah Hoch's works.  A montage is an act of editing, selecting, altering and putting together pieces of images to form a whole image. It was at 1915 that the form of photomontage was invented; used by the "Dadaist" a movement to a negative reaction towards WW1 at the time. Thereafter the method was used by the now-famous artists such as Hannah Hoch, creating a whole wide range of feelings through combining vast ideas. A similar method is widely used in this era, one that is probably familiar to most people. Photoshopping uses the same principle as a photomontage adding many different images that could result in a completely different look before the editing has started.  Hannah Hoch began to experiment with photomontage in the year of 1918. She has worked for Ullstein Verlag; designing knitting as well as embroidery patterns that were inspired by her photomontage work of the time. She sustained her work with photomontages for almost the rest of her life, even after she broke from the Berlin Dadaists.

Hannah Hoch | Confetta | Flickr